If your database is all lowercase when you move to your production server, your site will not work. You will see a MySQL error. This post details a simple fix on how to make sure your database tables are case sensitive and how to fix your database if you have already started your development process with Concrete5.
I do want to reiterate that this is most common, if not almost always, a Windows based operating system issue. If you use a program like MAMP or MAMP Pro, you’re much less likely to run into this issue.
I will detail two scenarios in this post. Scenario #1 assumes that you have not done anything yet and you are starting from scratch. Scenario #2 assumes that you’ve just tried to move your database to your production server and realized, “Oh crap! Why is this throwing this error?“.
Scenario #1: You’re just starting
So you’re one of the smart ones. You’ve just downloaded a fresh copy of Concrete5 and want to play with it on your local Windows based operating system. Perhaps you’ve heard that there is one thing you need to do before installing Concrete5 so that it plays nice with your production server down the road. Nice lookin’ out.
For the purposes of this post, I’m going to assume you are using XAMPP; however, the process is similar for the rest of the local development tools out there. Here’s what to do:
- XAMPP is installed. Locate the directory where you installed it to. By default, this would be
C:\xampp
- Navigate to
\xampp\mysql\bin and find the file “my.ini”. Open it in a text editor. Some people report this file being called “my.cnf”. YMMV.
- Around line 28 or thereabouts, paste
lower_case_table_names = 0. This tells your MySQL server that it should always use case sensitive database tables.
- Save the file and close it.
- If you’re already running MySQL & Apache via XAMPP, navigate to your XAMPP Control Panel and restart MySQL & Apache (“Stop” then “Start”).
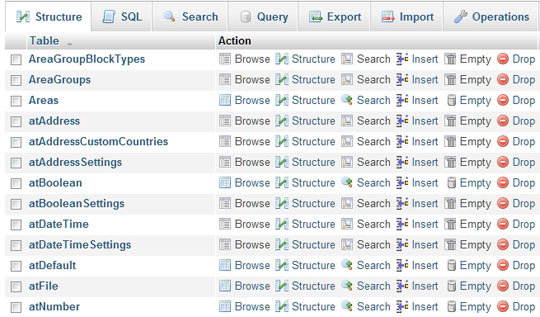
You’re MySQL databases will now be case sensitive by default. Double check yourself by installing the latest version of Concrete5 and check to make sure your database tables are camel case (eg: btExampleBlock).
Scenario #2: Case sensitivity rears it’s ugly head
So, you tried to move your database to your production server on the web. You’ve found out the hard way that case sensitivity in your database is as important as oil is to your car. Right now your database looks like this:
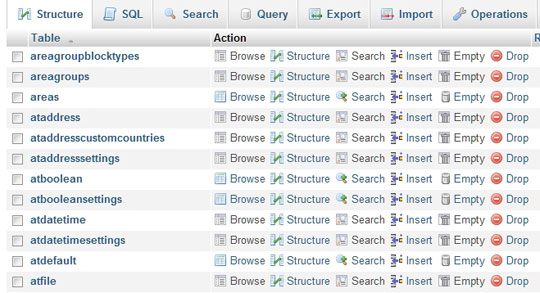
Poor you. That is not at all how it should look. You want it to look like this:
So how do you get your poor database to be case sensitive? You have to rename your tables. Luckily for you, lots of folks have been down this road and several people have figured out how to fix it. Here’s the best way:
- Backup your current lower case database, just to be safe.
- Concrete5 user Manio created a wonderful Add On for Concrete5 that does most (if not all) the work for you. Visit GitHub and download the package.
- Follow the instructions Manio has provided.
- Once the package is installed, go to the Database Migration page in your dashboard and hit “Run Migration”. This will convert your database tables to the proper format.
At the time of this writing, some third party Add On’s were not included in this migration package. Their tables will be listed at the bottom of the dashboard page. If you see offending tables, you will have to rename these tables by hand. Don’t worry, it’s pretty straightforward:
- The easiest way to manually rename tables is to click “Download Migration Script”. From here you can check out the plain text version of what the script is doing.
- Make a note of the tables that you will have to manually convert.
- Navigate to your troubled MySQL database via PHPMyAdmin.
- Click on the “SQL” tab.
- You’ll notice that the query the script runs for each table goes something like this. In this case, the table referenced is called “Areas”.
- Copy and paste this query for as many tables as you have to rename. Obviously, where it says “Areas”, change this word to the tables you marked down in step #2. Quite obviously, make sure you type these names out in a case sensitive manner. So, if you had a table that was btexampleblock and it needed to be btExampleBlock, here’s what you would type:
RENAME TABLE btexampleblock TO btexampleblock_tmp; DROP TABLE IF EXISTS btExampleBlock; RENAME TABLE btexampleblock_tmp TO btExampleBlock;
Now run the query & voila! You’re tables are now magically all correctly cased. Next time around, double check that you have run through Scenario #1 so that you don’t have to go through this process again on your next site. You should now be able to transfer your newly-polished database to your production server without issue.
I’ve recently removed comments from this blog. Want to chime in? See something wrong?
Email me at adam.b.johnson1@gmail.com. I’d love to hear from you. I read every email and welcome your input.