To clarify, I deem significant downtime during an upgrade as anything more than 5 minutes. If you were to “replace” your old concrete folder with a new concrete folder via FTP (ie: overwrite it), you would only be as fast as your Internet connection and your server. In most cases with shared hosting, this can take anywhere from 20 minutes to one hour.
That said, if you follow these instructions, you will only experience downtime of a few seconds:
- Backup your site (MySQL database & webroot).
- Download the latest version of Concrete5 from Concrete5.org/developers/download
- Extract the .zip file then rename the “concrete” folder to something like “concrete5422” or whatever the latest version is.
- Connect to your site via (S)FTP. Navigate to the directory where your site resides.
- Upload “concrete5422” to the root of your site (the same place as the “concrete” directory is). This usually takes several minutes.
- After Uploading has finished, your directory should look like this:
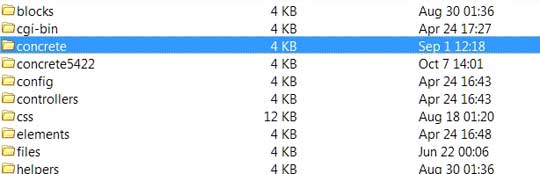 Double check to make sure all the files made it correctly onto your server.
- Rename the current “concrete” directory on your server to something like “concrete_old”.
- Then, rename the “concrete5422” directory you just uploaded to “concrete”. Your file structure should look something like this:
- Visit https://yoursite.com/index.php/tools/required/upgrade (obviously, replace “yoursite” with your site’s URL).
- Hit Upgrade.
- Congrats, you just upgraded your site with minimal downtime.
- Optional last step: If everything went well, it is now safe to remove the “concrete_old” directory. Right click it and select delete.
Some versions of Concrete5 don’t like to skip versions when upgrading. For example, if you have a version prior to v5.3.2, you should upgrade to version 5.3.2 first, then upgrade to 5.4.2.2, then to 5.5.1+.
One additional item to note is if you have ever used the Dashboard to update your site (via System & Settings > Update Concrete5), you will have to delete:
define('DIRNAME_APP_UPDATED','concrete5.x.x.x');
from your config/site.php file before you do step 8.
I am a big fan of keeping up with CMS releases; if you upgrade from version to version, you are more likely to have a flawless and pain-free upgrade experience.
By using this method it is very easy to quickly upgrade your site with very minimal downtime.
If you liked this post, feel free to Follow me on Twitter (all business there, I promise). Thanks for reading.
I’ve recently removed comments from this blog. Want to chime in? See something wrong?
Email me at Email me!. I’d love to hear from you. I read every email and welcome your input.